

IKEA Closet Hacks That Add Storage Without a Full Renovation

A closet can have plenty of shelves and still leave you searching for a belt, ironing a crushed shirt, or moving shoes to open a drawer. The problem is often the layout: too much space above folded clothes, too little room for long garments, or doors that block the storage behind them. DIY IKEA closet hacks are most useful when they fix those everyday frustrations first.
Start with the clothes and accessories you need to store, then choose the frame, interior fittings, and finish. A new handle or painted door can change the appearance, but it cannot rescue a drawer that collides with the bed. Likewise, a built-in look needs planning around walls and trim, not just a line of caulk.
These ideas range from rearranging organizers to planning a dressing wall. Choose the changes that suit your room, tools, and experience, then let the decorative details support the storage.
Choose the Scale of Your Closet Project
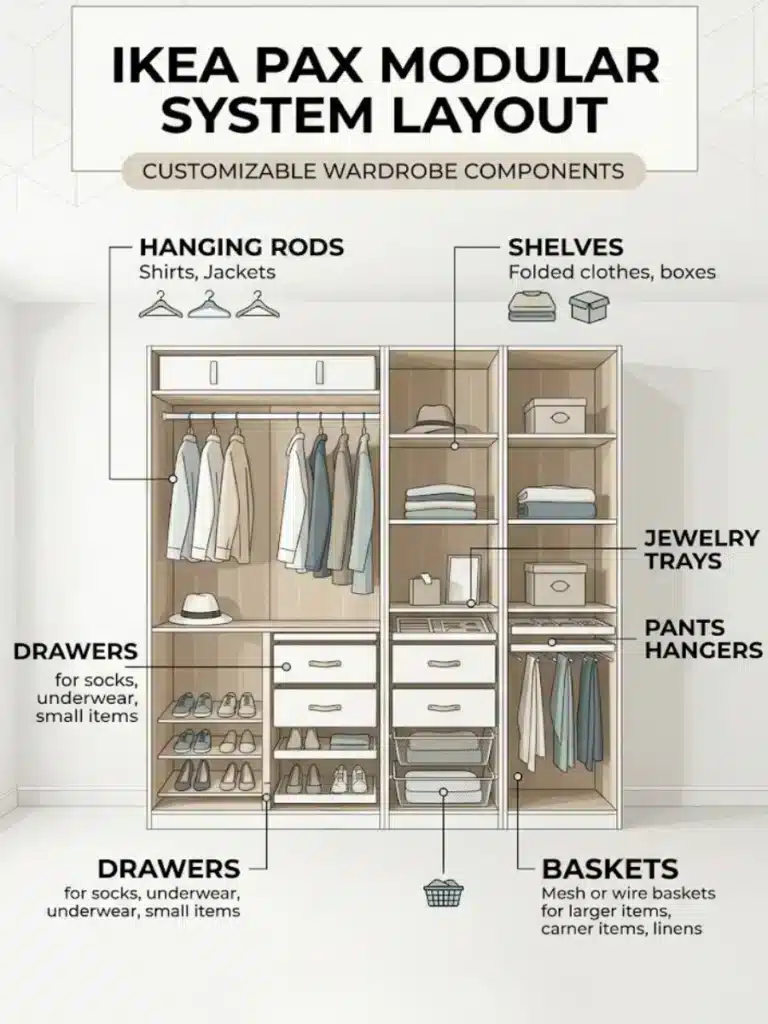
An IKEA closet project can be a simple storage reset, a surface makeover, or a fitted installation. Those are different commitments. Reusing a sound wardrobe and changing its contents is a sensible first move when the frame already fits the room. A fitted wall with fillers and trim takes more measuring, finishing, and installation work.
Set the scope before shopping. Keep the frame and its required fixings intact, and use the manufacturer’s assembly instructions as the starting point. Decorative additions should follow a properly installed storage system rather than compensate for a frame that is uneven or poorly secured.
| Project scope | What changes | The decision to settle first |
|---|---|---|
| Organization refresh | Boxes, shelf positions, compatible rails or inserts | Which clothing categories need more usable space? |
| Surface makeover | Suitable paint system, handles, or a decorative backing | What is the actual surface, and how will the finish adhere? |
| Built-in appearance | A planned arrangement with separately detailed fillers and trim | How will the frames be installed, anchored, accessed, and finished? |
Measure the Space With the Closet in Use
Record the wall width at the floor, middle, and top, and measure ceiling height at several points along the proposed run. Note baseboards, uneven floors, switches, sockets, window trim, radiators, and the room door’s full swing. The narrowest or lowest point may control what fits.
Then measure the usable space in front. Mark the proposed frame depth on the floor and account for doors, handles, an open drawer, and the person using it. For a sliding-door arrangement, check which openings are accessible when a panel is moved. An opening that accepts a frame is not necessarily wide enough for every planned pull-out.
Use the assembly instructions for the exact article number and market. Current and older PAX frames can have different assembly methods and ceiling-clearance requirements. In a rental, obtain permission for required fixings and finish changes before buying. If required anchoring is not permitted, choose another approved storage approach.
1. Configure PAX Around Your Actual Wardrobe

The L-shaped arrangement uses hanging sections, drawers, and open shelves to give different clothing categories their own bays. Begin with your longest garment on its hanger and allow for it to hang freely. Give shirts, folded clothes, shoes, and accessories their own zones instead of repeating the same shelf spacing in every frame. The goal is a layout you can maintain after laundry day, not an empty display that only looks organized.
Use your IKEA PAX layout ideas as a starting point, then verify the parts in IKEA’s planner and product instructions. The KOMPLEMENT drawer listing, for example, specifies the PAX frame size it fits; a similar-looking drawer is not universal. Check frame width, depth, door arrangement, and internal fittings together before ordering.
2. Make a Budget Closet Look Organized With Fewer Containers

The pale boxes above the central drawers create a repeated outline, while smaller woven baskets group accessories below. That mix keeps the open closet orderly without making every container identical. Measure the shelf opening and choose boxes that pull out easily without dragging against the shelf above. Keep rarely used accessories higher up and everyday socks, underwear, and small items within comfortable reach. A label is useful when it tells you where an item belongs after washing.
Start your closet organization refresh with existing containers before replacing them. A row of similar hangers can reduce visual noise, while low dividers can keep folded piles from spreading. Reserve only the space below hanging clothes that remains clear when the longest items are in place. Do not buy a full set of boxes until one sample fits the shelf and your storage routine.
3. Plan a Small Closet Around Access and Door Movement
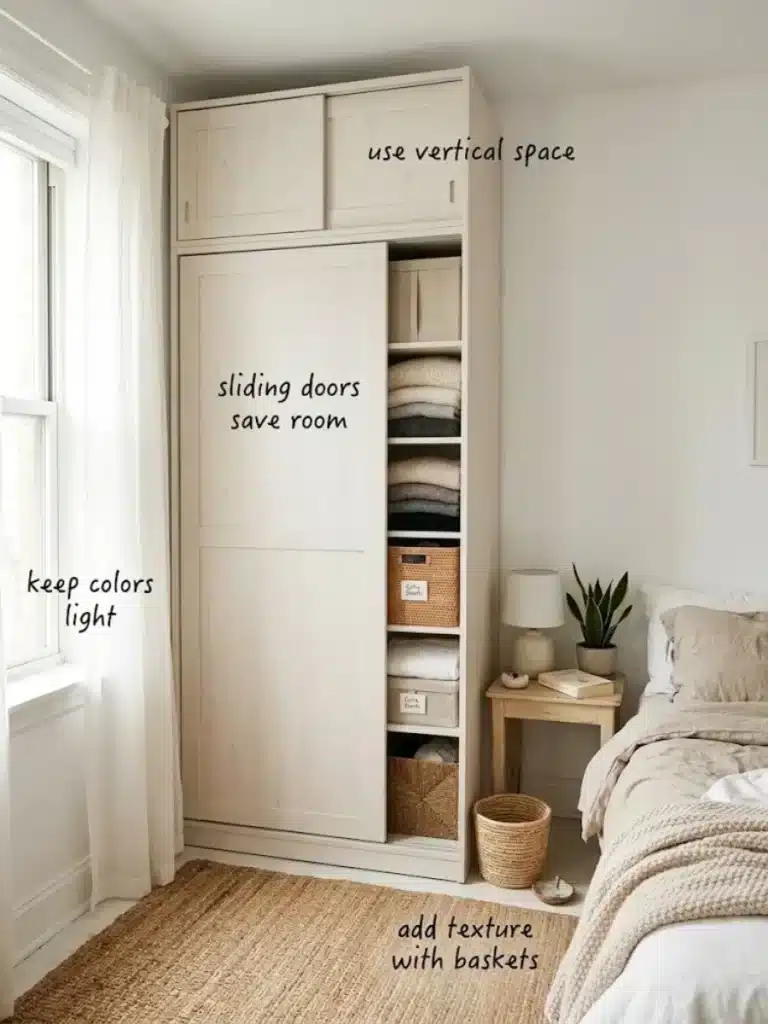
The pale wardrobe beside the bed keeps its front simple, with a sliding panel concealing part of the storage. In a compact bedroom, storage depth and the space in front matter as much as wall width. A shallow arrangement may preserve a walking route, but it can need a different hanging solution from a deeper wardrobe. Plan the clothes orientation and compatible accessories before choosing it. Use taller frames only where the exact model can be assembled and used as instructed; do not stack wardrobes to reach the ceiling.
Hinged doors expose a whole bay but need room to swing. Compatible sliding doors reduce that swing requirement while covering part of the opening at a time. A separately mounted curtain can soften the view, though it does not remove the frame’s anchoring requirements. In a corner, map the opening sequence so one section does not block the next. Keep the finish simple and let clear access, rather than a pale paint color alone, make the room easier to use.
4. Give Wardrobe Doors a Considered Surface Makeover
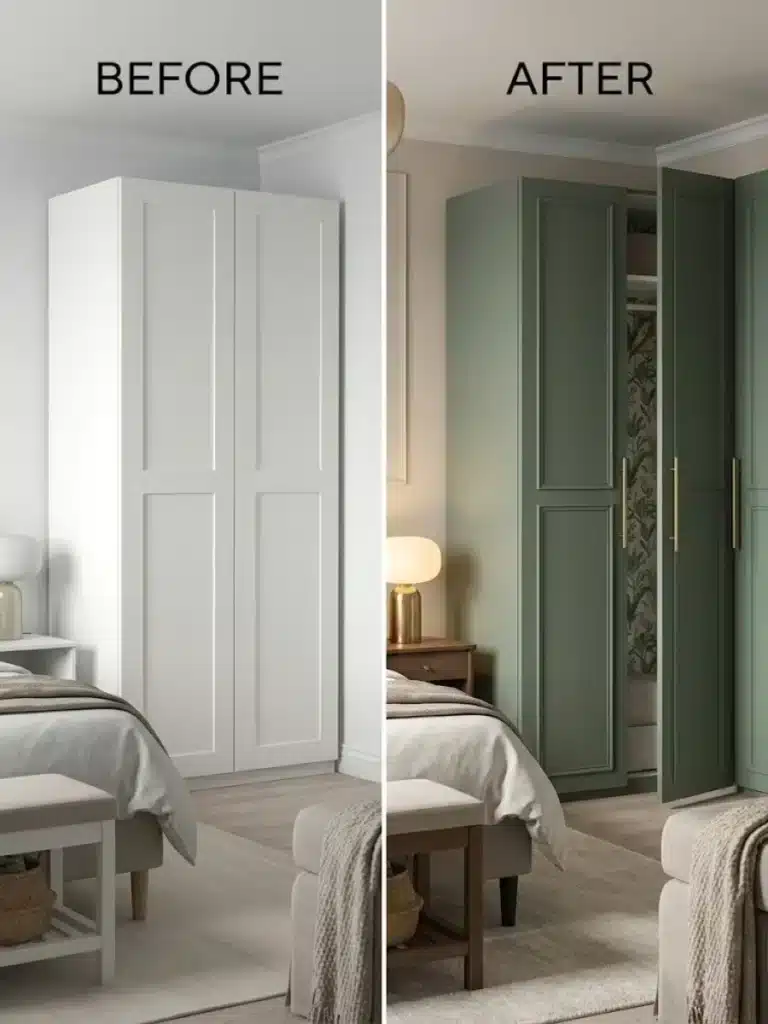
Muted green and framed door details give the pictured makeover concept a stronger outline than the plain white version. A similar finish change can connect a closet with existing furniture without changing the interior layout. Repeat one finish from the room, such as a muted wall color or the tone of bedside hardware. Test a handle position while standing and reaching naturally, and check that neighboring handles will not collide. Reusing the existing hole spacing can simplify a hardware swap when the door and replacement fittings are suitable.
Check the door’s listed material before painting. Paper foil, a painted surface, and solid wood need different preparation; chalk paint is not a universal shortcut. A compatible coating system should specify cleaning, any abrasion, primer, topcoat, and curing. Rust-Oleum’s primer guidance explains the adhesion role of primer on slick surfaces. Test the chosen system on an inconspicuous area, follow its instructions, and avoid sanding through a thin finish.
Add Pattern Without Complicating the Doors
For a smaller change, use a decorative backing designed for the surface, or fit a removable decorative insert only where it leaves the wardrobe’s original backing and structure intact. Test adhesion and removal before applying a large area. Added door trim changes thickness and weight, so check hinge suitability and clearances rather than assuming any molding can be glued onto any door.
5. Detail a Built-In Look Without Hiding Installation Problems

Repeated white paneled fronts and aligned top and bottom lines give this closet a continuous appearance. The built-in effect comes from how the wardrobe meets the room, including its side margins and surrounding trim. Plan those edges on paper before buying the frames. A closet hack for a tight space still needs access to its doors, fixings, and any services nearby. Fillers are decorative finishing pieces, not a substitute for securing the storage correctly.
Follow the model’s installation sequence, level and secure the frames, and check the doors before detailing the gaps. The current PAX frame listing requires wall mounting with the supplied rail and suitable wall fasteners. Plan independently supported trim where needed; do not assume a thin wardrobe panel can support extra carpentry. Baseboard changes, awkward walls, and built-up plinths may warrant a carpenter’s help.
Plan the Finish in the Order It Will Be Seen
- Set the wardrobe position: Resolve wall irregularities, services, and the manufacturer’s mounting requirements before fixing decorative parts.
- Check the moving parts: Open doors and drawers fully before finalizing side fillers, handles, or top trim.
- Detail the edges: Choose the support, material, and profile for each finishing piece. Keep required access and clearances available.
- Finish the junctions: Use products suited to the actual materials. Caulk is for suitable finishing joints, not correcting a large unsupported gap or fastening a cabinet.
6. Light the Clothes and Shelves You Need to See

Place closet lighting where it illuminates the front of clothes and the contents of shelves. A glow behind the frame may outline the installation without helping you find a dark shirt. Consider what blocks the light as well: a shelf, a hanging rail, or an open door can leave the storage beneath it in shadow. Check the result with the closet loaded, not only while the shelves are empty.
ÖVERSIDAN wardrobe lighting is a verified PAX option with installation and compatibility details on its product page. Confirm the exact light, driver, power cord, controls, and mounting arrangement as one system. Route leads where doors and drawers cannot pinch them and keep required components accessible. Choose cabinet lighting for the location; use qualified help for new fixed wiring or sockets instead of improvising electrical connections inside furniture.
7. Create a Dressing Wall With a Usable Center Space

The central table, round mirror, and tucked-in stool give the dressing area a clear purpose between two storage sections. Pale fronts and soft pink accents keep the center connected to the room. Decide whether the middle needs to function as a vanity, a mirror area, or an open landing space before fitting the wardrobes. If it will be used seated, test the chair, knee room, and pull-back space with the rest of the furniture in position.
Keep the center visually quieter than the storage around it. A mirror aligned with the middle area and one repeated handle finish can connect the arrangement. Use shallow organizers for small accessories and leave a clear surface for daily use. Secure the mirror with suitable fixings and keep makeup lighting appropriate to the task. A dressing nook should not block access to the adjacent wardrobe doors or become the only route to the room’s exit.
8. Match Each Interior Organizer to a Clothing Category

Choose the organizer by the item, rather than filling a planner with every available accessory. Drawers contain small pieces that would scatter on a shelf. Pull-out trays can make belts and jewelry easier to see. Shelves suit accessible folded stacks, while a hanging zone protects the space needed by garments that should not be folded. Put the categories you use most often where they take the fewest steps to reach.
Check the fitting’s stated frame dimensions, load limits, and opening clearance. A pull-out needs usable space beyond the frame, and door hardware can affect placement. For shoes, test your tallest and longest pairs before committing to uniform shelf gaps. Containers should fit the real internal dimensions, not just the frame’s nominal width. Store occasional items higher up only when you have a suitable way to retrieve them; do not plan on climbing drawers or shelves.
9. Coordinate Handles, Fronts, and Baskets as One Finish
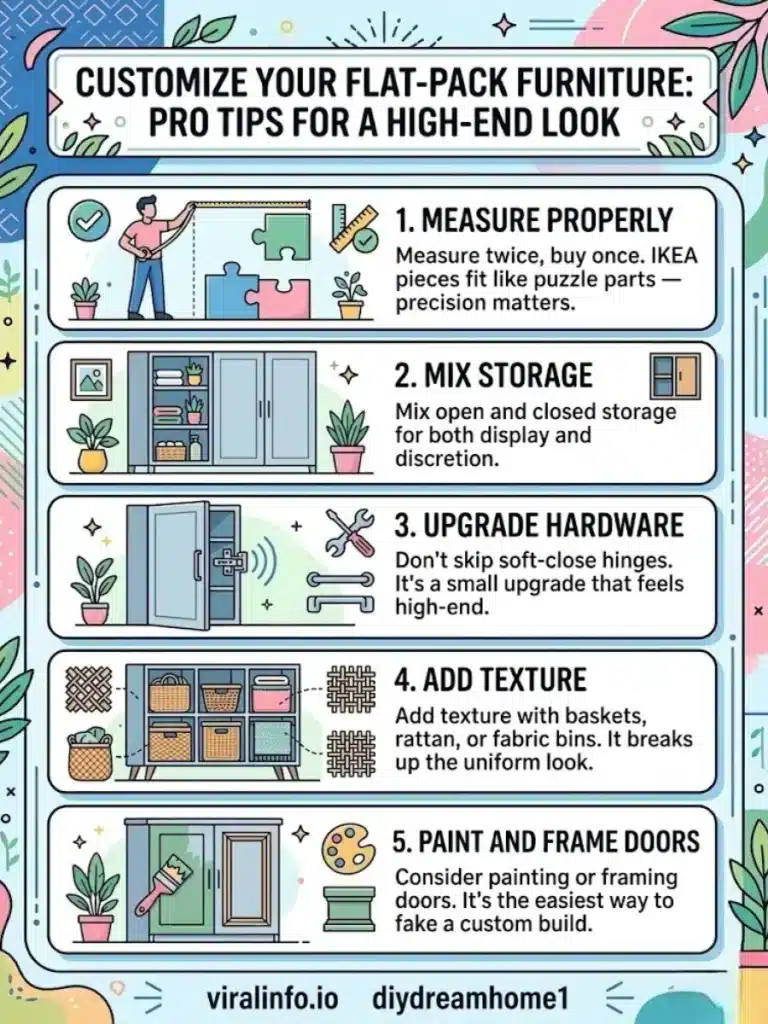
Choose the closet’s main visual element first. Flat fronts and consistent hardware can support a calm contemporary room, while framed fronts and restrained trim can relate to more traditional furniture. Repeat one metal finish and one container style instead of adding a different decorative treatment to every door. Open sections look more settled when a few functional containers share a shape or color.
Set handle positions with a template after checking grip, screw length, door construction, and collisions between neighboring doors. Avoid drilling until the position works in use. If you already have compatible soft-closing hardware, replacing it may offer little benefit; check what is included in your exact combination. Use a sample paint or finish beside the wall and flooring in daylight and evening light before committing to a whole run.
10. Choose a Finish Direction You Can Carry Through the Room

The wood-look slatted fronts and dark frame make this closet a feature wall, while an open section keeps hanging clothes accessible. Repeating the darker tone in nearby furniture can connect the wardrobe with the bedroom. Use the design as inspiration for a coordinated finish, then choose the level of intervention you can manage. A contemporary version might use plain fronts and dark handles; a softer traditional version might repeat the wall color and use simpler warm-metal hardware. Neither needs a different treatment in every bay.
For an open display, keep repeated everyday items together and give containers a defined purpose. A curtain-front version can reduce the visual detail while keeping the interior accessible. If you prefer a wood-look finish, compare suitable ready-finished fronts before considering applied veneer. Added finishes require compatibility checks and careful edge details. Choose the direction that works with the room you have, then stop before the decorative work begins to interfere with access.
Gather Tools and Materials for the Specific Change
Build a shopping list around the work you have chosen. Include required wall fasteners, door hardware, interior fittings, finishing materials, delivery, and any hired help. A frame price alone does not represent the cost of the finished closet. Product ranges and installation details vary by market, so save the article numbers and current instructions with the plan.
| Task | Useful tools or materials | Check before starting |
|---|---|---|
| Layout and measuring | Tape measure, level, room sketch, exact product instructions | Width at several heights, assembly space, and full opening clearance. |
| Frame assembly and installation | Tools and wall fixings specified for the exact model | Wall type, required mounting arrangement, assistance, and load instructions. |
| Handle replacement | Correct fittings, measuring template, and suitable drilling tools if needed | Existing hole spacing, screw length, door material, and collisions. |
| Paint makeover | Surface-compatible cleaner, preparation materials, primer and topcoat as specified | Adhesion test, ventilation, drying conditions, and full cure time. |
| Built-in finishing | Measured filler and trim details with appropriate supports and fixings | Door travel, access, structural support, and the need for skilled cutting or fitting. |
Work in an Order That Avoids Rebuilding the Closet
Settle the storage plan and door choice before adding decorative detail. Keep a record of the frame sizes and parts, then follow the installation instructions supplied for those exact products. Avoid relying on an older tutorial when the frame construction or mounting method differs.
- Inventory and draw: Measure the clothes, room, obstructions, and moving parts. Assign a function to every bay.
- Confirm compatibility: Review frames, doors, interior fittings, lighting, and required fixings together.
- Test any finish: Prepare a sample with the chosen coating or decorative material before completing visible surfaces.
- Install the storage: Assemble, level, secure, and fit components in the manufacturer’s sequence. Arrange any added carpentry as a separate, properly supported detail.
- Check before finishing: Operate every door, drawer, tray, and light. Make adjustments before final trim or other details limit access.
- Load and refine: Follow stated loads, put everyday items within reach, and check that garments, baskets, and leads do not interfere with movement.
Live with the arrangement before buying the last decorative accessories. If one area repeatedly overflows while another stays empty, adjust its assigned job or compatible fittings. A successful closet hack earns its place through easier mornings, clear access, and a finish that belongs in the room.

