

IKEA IVAR Hacks for Stylish, Functional Storage

IKEA IVAR hack ideas start with a useful choice: let the wood grain lead the design, cover it with a considered paint color, or add a new detail to the doors. Those routes can produce very different furniture from a similar starting shape. The strongest result comes from choosing one direction and carrying it through the finish, hardware, and surrounding room.
A stained cabinet beside a reading chair needs different decisions from a full storage wall. One may only need surface preparation and new handles; the other brings in measurements, fixing requirements, and support details. Treating every makeover as a quick cosmetic job is where avoidable problems begin.
Start by identifying the IVAR components you own, then choose a finish and a realistic scope. The ideas below cover preparation, painted and wood-grain looks, textured fronts, and styling, with the practical checks that help each choice work beyond the photograph.
Start With the IVAR Piece You Actually Own
Check the Materials Before Choosing a Hack

The contrast between pale open storage and a darker cabinet shows how much the finish and front treatment change the outline. Pine components can suit both a visible-grain finish and an opaque paint system. That flexibility is useful, but it does not mean every surface or component in the IVAR range has the same construction.
IKEA’s listing for the shallow pine IVAR cabinet identifies solid-pine main parts and door panels with a fiberboard back. Check the article number, materials, assembly instructions, and intended support for your own version. Existing coatings on a secondhand unit also change the preparation. Do not assume old and new parts connect simply because they share the IVAR name.
Choose the appearance and the practical use together. A surface for everyday drinks needs a finish suited to that use; a decorative cabinet front may face different wear. Check the coating instructions for each material, not only the pine doors.
| Finish direction | What it emphasizes | The decision to test first |
|---|---|---|
| Opaque paint | A clear color and a simpler outline | Primer needs, knot bleed, adhesion, and the final sheen. |
| Wood stain | Grain, variation, and a darker or altered wood tone | Even absorption and the color after the complete finish system. |
| Pale wood treatment | A lighter, less opaque appearance | How the product changes the grain and warmth on your actual panels. |
| Added door texture | Vertical rhythm or framed shapes | Weight, hinge suitability, edge clearances, and a reliable attachment detail. |
Prepare the Finish Before Committing to the Color
Plan Which Parts to Finish Before Assembly

Flat panels on a work surface are easier to reach than the inside corners of a built cabinet. Where the assembly instructions and coating process allow it, prepare and finish accessible faces before final assembly. Support the panels securely and keep the fittings labeled so the project stays organized while the surfaces dry.
Check which faces, joints, hardware seats, and moving surfaces must remain clear before coating everything. Paint buildup can affect fit, and some modifications need a dry layout first. For an existing unit, remove doors or shelves only as its construction permits. Let the finish cure as directed before stacking parts or tightening hardware against it. Dry to the touch and ready for assembly are not always the same point.
Sand to Suit the Surface and the Coating

Light sanding can smooth rough fibers and preparation marks, but the right abrasive depends on the starting condition and chosen coating. Work with the grain, check the surface between passes, and avoid rounding a crisp edge simply to make the whole piece feel smoother. A sanding block can help keep flat work consistent.
Follow the finish manufacturer’s preparation sequence rather than applying one grit to every project. Remove dust with a method compatible with the coating, and let any damp-cleaned surface dry. Treat thin or non-pine panels according to their material. If a used piece has an unidentified old finish, establish a suitable preparation method before sanding it extensively.
Test for Blotching Before Staining Pine

A stain sample is useful only when it represents your actual finish process. Test on a concealed solid-pine area or a suitable sample, using the intended preparation, stain, and protective finish. Let the sample dry as directed before judging the color. The wood’s natural variation will still be part of the result.
Minwax explains that pine can absorb stain unevenly and that a compatible pre-stain conditioner can help reduce blotching. Choose the conditioner for the stain system; an oil-based product is not interchangeable with a water-based preparation. Follow its application window and excess-removal instructions. Conditioner can improve consistency, but it does not guarantee every knot and board will match.
Choose Primer for the Problem It Needs to Solve

A pale painted door needs a sound, consistent base, particularly where knots or existing marks might show through later. Match the primer to bare wood, any existing coating, and the selected topcoat. A generic instruction to apply two coats of acrylic primer cannot cover every situation.
For persistent knot or sap-streak bleed, Zinsser B-I-N is a manufacturer-listed knot-sealing primer option. Use the exact product’s instructions for suitability, ventilation, coverage, and recoating. Follow the paint system’s direction for the rest of the surface, and inspect the sample before proceeding. Primer prepares and seals as specified; it does not erase every physical wood-grain texture.
Choose the Applicator With a Sample Panel

The comparison between two pale sample fronts is a reminder to test the application method under the light that will reveal it. A brush, pad, roller, or spray finish behaves differently with different products. No applicator produces a superior result with every coating, and a demonstration image cannot establish a universal rule.
Use the tool recommended by the coating manufacturer and test it on a small area. Load it consistently, work within the product’s open time, and avoid repeatedly disturbing a coat that has started to set. Follow the stated coverage and drying instructions instead of making one heavy pass to hide the grain. Inspect a cured sample from an angle before finishing all the doors.
Choose a Finish and Front Detail That Suit the Room
Use a Dark Stain as the Room’s Wood Accent
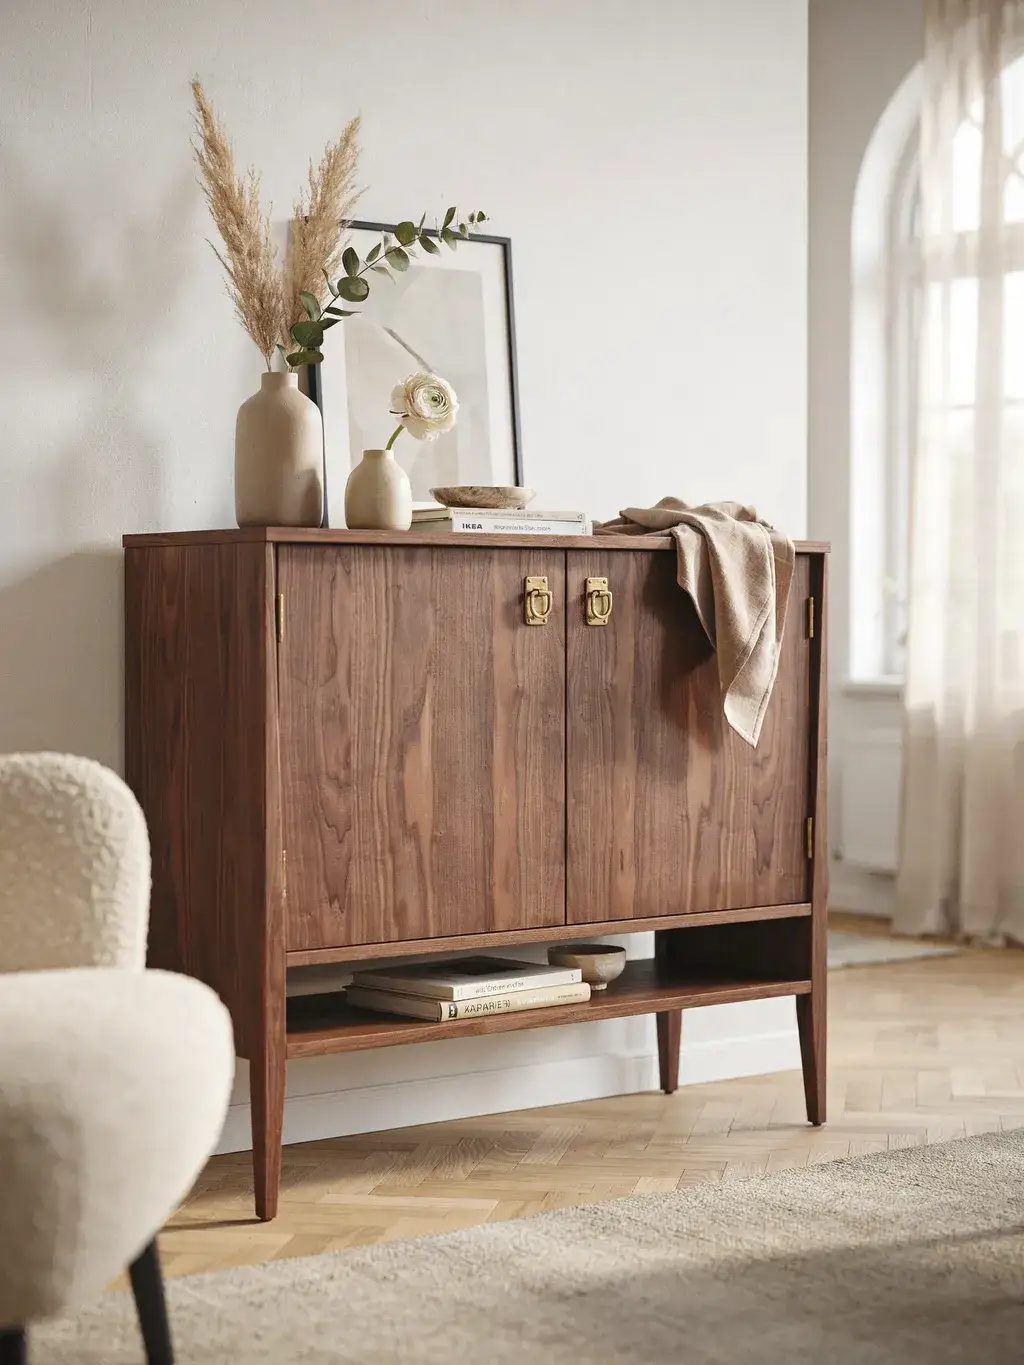
The dark wood-look sideboard has more visual weight than pale shelving, while the light wall and floor keep its outline clear. Pair that kind of cabinet with a restrained top display: a taller vase at one end and a lower object or book group nearby. Let the door texture and wood tone carry most of the detail.
Test the complete stain system beside the room’s existing timber before committing. A color named walnut will not make pine look identical to walnut, and different boards can retain different patterns. If the finish is very dark, check that the handles remain easy to locate and that the cabinet does not disappear against a similarly dark background.
Match the Wall Color for a Quieter Cabinet Front
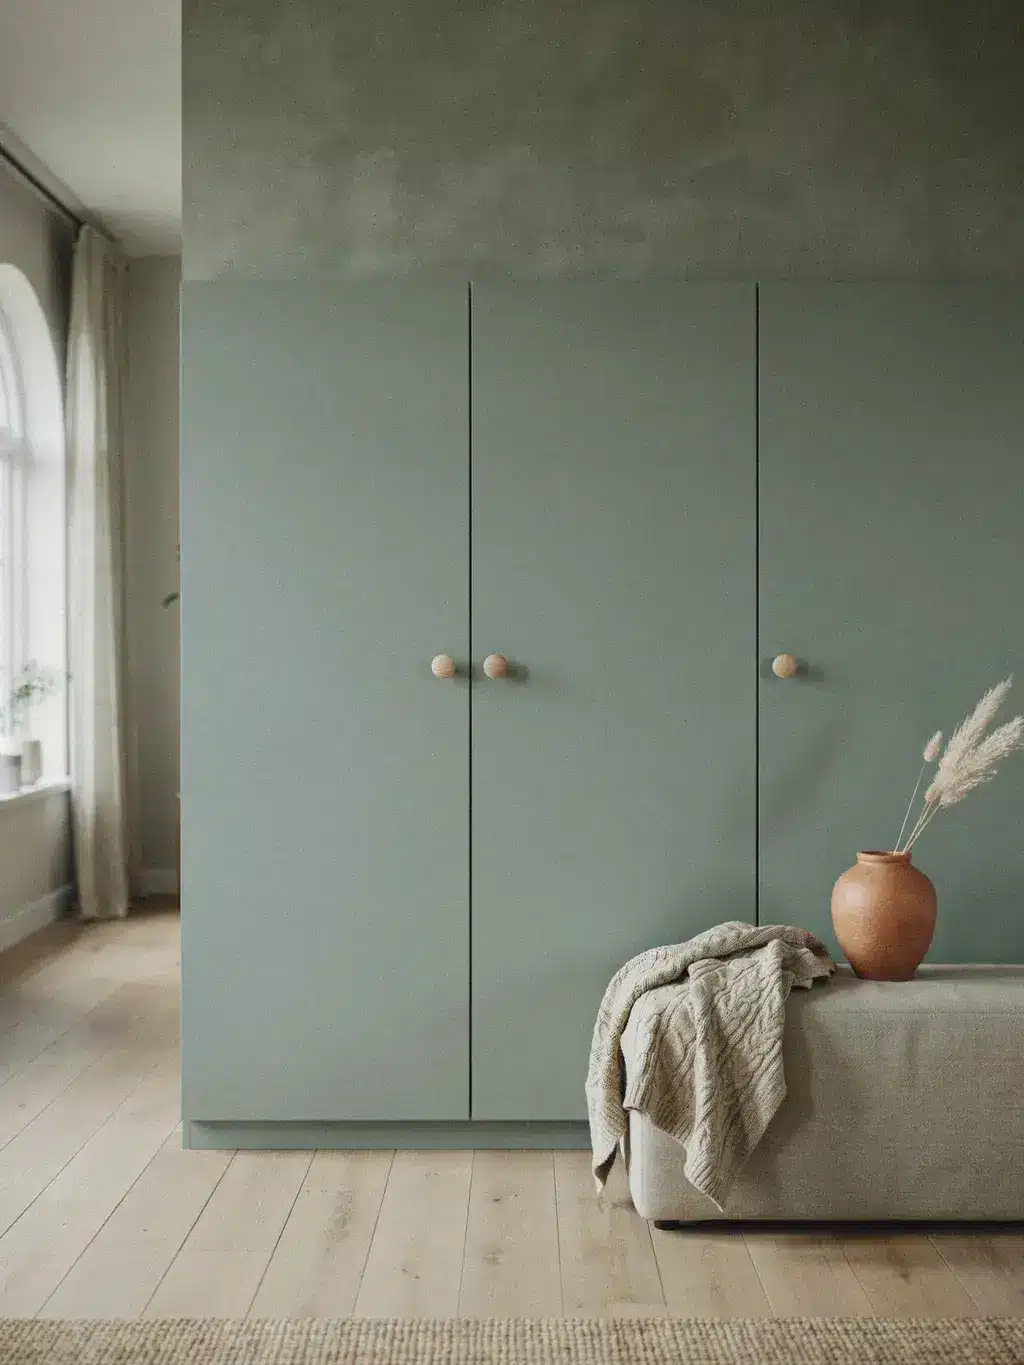
The muted green cabinet blends with the wall behind it, allowing the door lines and small handles to provide the definition. This is useful when you want storage to recede instead of becoming the room’s main feature. Repeat a related green or neutral nearby, and let a textile or ceramic object provide the contrast.
Use a furniture-suitable coating even when matching a wall color. Wall paint and cabinet paint are not automatically interchangeable, and different sheens or substrates can make the same color appear different. Compare samples in daylight and evening light. Keep door gaps operational; painting a unit to match its surroundings does not make it a built-in installation.
Add Reeded Texture Only After Checking the Door Detail
Vertical ribs give the green front a strong rhythm, while the simpler top and surrounding wall keep the effect readable. If you choose a similar treatment, use one consistent spacing pattern and test the first and last strip positions across the full door width. A partial strip at an edge can look accidental.
Added dowels or slats change the door’s weight and thickness. Check hinge suitability, edge clearance, handle placement, and a reliable attachment method before cutting or gluing. Keep the treatment clear of moving edges and hardware. This is a measured woodworking modification, not an automatically beginner-friendly upgrade. A prepared textured front may be a better route where the original door cannot accept the proposed detail.
Use Narrow Molding for a Framed-Front Look

The pale framed doors relate to the traditional shapes around them, while the open upper area prevents the tall storage from becoming an uninterrupted solid block. Narrow molding works best when the frame width suits the door size and the rectangles align across neighboring fronts.
Draw the molding layout at full scale before cutting. Check for handles, hinge-side movement, and any trim that could collide when the door opens. Use material and fixings suitable for the door construction and account for the added weight. Keep the surrounding styling relatively quiet: a framed door, an ornate rug, and several busy accessories can compete for attention.
Use Woven Panels as a Considered Door Replacement

The woven-look door centers introduce a lighter texture within a wood-toned frame. A similar combination suits a room with plain curtains and upholstered furniture because the repeated weave supplies detail without needing a strong paint color. Keep accessories above it simple enough that the texture remains the focal point.
A true open woven panel needs a suitable door frame and a secure installation detail. Cutting out an existing door changes its construction, so get appropriate cabinetmaking advice or use a compatible prepared front. Applying weave over an intact panel does not create ventilation through it. Follow the webbing supplier’s preparation instructions; soaking, stretching, and fixing methods vary. Do not rely on the weave alone to establish safe airflow for equipment inside.
Treat New Legs as a Support Decision

A gap beneath the pale cabinet makes the silhouette feel lighter, and the slim warm-metal details connect with the natural finish. Before aiming for that look, decide whether the piece needs a base designed for it or a separately detailed support. The appearance of slender legs does not reveal their mounting or capacity.
Confirm that the cabinet’s construction can accept the proposed support, including its full loaded weight and stability. Do not screw leg plates into a thin panel or assume every IVAR cabinet is intended to stand in the same way. Choose a compatible manufacturer-supported arrangement or obtain a properly designed modification. Keep required anti-tip anchoring; lifting the cabinet does not remove it.
Compare a New Top With a Continuous Plinth

The two sideboard concepts use different outlines: a more visibly wood-grained cabinet and a pale front with a contrasting top and base. A continuous top can visually connect neighboring units, while a plinth can make the lower edge feel settled. Choose the outline that relates to the furniture and floor around it.
Plan support and fixing before selecting the material. A heavy stone remnant can add substantial weight, and a loose overhanging board is not a finished installation. A plinth also changes the way the cabinet is supported. Have those details checked for the exact unit rather than borrowing a photographed solution. Include any overhang and open-door travel in the room layout.
Use a Patterned Backing to Frame the Display

The small floral backdrop provides a common setting for the books, basket, and ceramics. Because the pattern already adds detail, the objects can stay simple in color and shape. Begin with one taller group and one lower group per shelf, then leave visible sections of the backing rather than covering it entirely.
Confirm the backing material and do not remove any panel that contributes to the unit’s required construction. A removable decorative insert can be useful if it leaves the original backing and access intact. Test any adhesive or coating on an inconspicuous area, especially on unfinished or porous surfaces. Reposition shelves only within the system’s permitted arrangement and stated loads.
Use Hardware to Connect the New Finish With the Room

The long warm-metal pulls give the dark fronts a clear repeated line. Use that contrast intentionally: repeat a metal tone already present in a lamp or nearby furniture, or choose a simpler finish where the door treatment is detailed. The handle needs to feel comfortable as well as look proportionate.
Test positions with a paper template before drilling and check neighboring door movement. Confirm the hole spacing, screw length, and the material at the fixing point. A raw wood surface does not make misplaced holes invisible. For more IKEA furniture customization ideas, carry over the same habit of checking construction before changing fittings.
Choose a Wood Wash Intended for Furniture

The pale cabinet retains a visible wood-grain effect without making the finish the strongest color in the room. That softer direction works with cream upholstery and a quiet wall because the shapes remain legible while the palette stays restrained. Add a darker small object only where the display needs definition.
Use a product specified for the wood and desired appearance. A furniture whitewash, a paint wash, and masonry limewash are different treatments. Do not dilute an arbitrary paint with water unless its instructions permit it. Test the full system, including any required protective coat, and compare the dried result with the surrounding floor. The final opacity should be a deliberate choice, not an attempt to hide uneven application with extra layers.
Test a Pale Finish Without Promising Permanent Color

The side-by-side wood samples make undertone easy to compare. For a pale IVAR finish, test the panel beside a piece of white paper and the room’s existing wood. A slightly warmer finish may coordinate better with an oak-toned floor than the palest possible result.
Choose the coating for its stated appearance and suitability, then make a sample. Do not assume a water-based finish will prevent all future yellowing or that white wax is compatible with every previous treatment. The wood, existing surface, light exposure, and finish all affect the result. Save the product details so you can maintain or repair the same system later.
Finish and Install the Piece for Its Actual Use
Add a Protective Coat Only When the System Calls for It

The visible grain and low sheen create a quieter surface than a highly reflective finish, but sheen is a design preference rather than a measure of quality. Decide how the piece will be handled: a cabinet door, a book shelf, and a top used for drinks face different wear.
Check whether your chosen paint or stain requires a separate protective coat. General Finishes states that its Milk Paint does not always need an added topcoat, illustrating why “always seal everything” is too broad. Use only a compatible system, and follow the required drying, recoating, and curing stages. Wax is not a universal base for another finish. Handle and dispose of coating-soaked materials as their labels direct.
Plan a Storage Wall as a Complete Arrangement

The wall-length arrangement uses repeated fronts around an open central display, which breaks up the large painted surface. Copy the organization of the composition: determine where closed storage is needed, place the display where it can be seen, and align the visible edges intentionally.
Use only combinations permitted for the exact IVAR components or have the altered installation designed. Sharing a range name does not authorize arbitrary stacking or wall hanging. Keep access to sockets, vents, fixings, and doors. If fillers and trim are added, detail their support separately rather than treating caulk as a fastening method. Compare the whole project cost, including fittings and labor, instead of assuming a fixed saving over custom cabinetry.
Give Open Shelves and Closed Storage Different Jobs

The open shelves keep books and a framed piece visible while lower doors contain the less decorative storage. Keep that division functional: put everyday display items where they can be reached, then use closed areas for grouped supplies or belongings that would make the open shelves crowded.
Style the open section with repeated book heights or one shared ceramic color, then add a single taller focal point. Avoid filling every gap with small ornaments. Keep heavier items within the component’s specified loads and at practical retrieval heights. A plant should be removable for watering, with protection beneath the pot. Simplify the display where foliage or objects block access to the shelf behind them.
Follow the Exact Anchoring and Mounting Instructions

Anti-tip anchoring and hanging a cabinet from a wall are different tasks. Follow the installation instructions for the article number you own and choose fixings appropriate to the wall. Required securing is part of the installation, including in homes without children. A general illustration cannot specify the correct screw, plug, fixing position, or support for every wall and IVAR version.
The current U.S. IVAR cabinet 700.337.66 listing states that it is used on IVAR side units and must not be hung on the wall. It also requires secure anchoring. Check your own model rather than transferring a shallow-cabinet hack to a deeper version. If the support or wall construction is uncertain, obtain appropriate installation help before loading the furniture.
Style the Finished IVAR for the Place It Will Live
Choose the surface arrangement after you know how the cabinet is used. In a hallway, reserve a landing place for keys or post, then add a narrow vase only where it does not obstruct passing people or door movement. Check the usable route with the doors open, not just with the cabinet closed.
Beside a reading chair, use one taller object at the back and a low book group to the side. Keep a clear place for anything you set down regularly. A light cabinet can take a darker frame or bowl for contrast; a dark cabinet may read more clearly with a pale ceramic piece. Use stable bases and avoid building a tall display on uneven stacks.
For an office or craft area, fit the interior to the supplies first. Measure the containers you use, allow room to lift them out, and label the contents where that prevents searching. Keep the top simpler if the shelves are already visually busy. The best finishing detail may be leaving enough clear surface to do the work.
Use a Sample and a Parts List to Keep the Project Manageable
Choose one main change, such as a new color or door texture, and price the supporting work before buying. Include preparation products, the complete coating system, applicators, hardware, supports, delivery, and any skilled help. A cabinet price alone does not describe the cost of a finished hack.
- Record the model: Save the article number, materials, assembly instructions, and permitted installation arrangement.
- Check the room: Measure the finished depth, handles, door swing, nearby trim, and walking route.
- Test the finish: Use the actual preparation and full coating system on a representative area.
- Resolve added parts: Check door weight, clearances, attachment details, and support before making changes.
- Finish and install: Allow the stated cure, complete the required securing, and test moving parts before loading.
For a rental, check permissions for required fixings and any changes to the room. A project described as a renter-focused IKEA hack still needs the installation its manufacturer requires. When choosing a paint color for an office or another room, settle the sample before committing to every panel.
A clear finish direction, a sound installation, and a useful place in the room do more than a long list of alterations. Finish one idea properly, then add another detail only when it improves how the piece looks or works.

